Wednesday 29 April 2015

Ventus W831 First impressions: Part 2

(  )
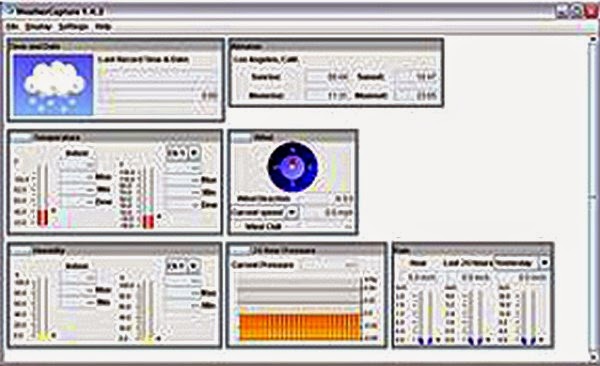
The worst problems, so far, lie with the provided software. Weather Capture Advance Version 1.4 is supplied on a DVD.  The display unit must be connected to a computer with the supplied 2meter long USB cable for the software to function. Otherwise it gives a warning to connect and promptly deletes itself from the screen! While the supplied software is running it constantly updates its monitoring of remote unit transmission on a bar scale counting down from 2 minutes. Note that though an "expand to full screen" button is shown above the display box it remains determinedly fixed at about 1/2 of my total screen width. [See image of screen grab.]

Some screen settings produce on-screen boxes with very obviously chopped off  sides and bottom. And, even more importantly, no visible buttons to choose, update or close that setting below the adjustable choices! I could only hit Enter on my computer keyboard to remove several settings boxes from my computer screen! The instructions book shows the settings boxes being much wider and deeper than actually appear on my computer screen. Which is very irritating to say the least and completely unforgivable at this price point! The software might be corrupted or is simply well below the perceived standard of the Ventus W831 Weather Station itself. Very disappointing! I shall uninstall and reload the software to check for any improvement. [It didn't!]

Much more information on the bundled software in the previous post.

I have placed the external thermo-hygro wireless sensor under the deep northern eaves of the house. The unit is hanging right beside the external sensor of my Indoor/Outdoor, cabled, digital thermometer. Both sensors avoid any sun warming effects and are well clear of the underside of the already shady side of the roof. Nevertheless, temperatures shown on the Ventus are sometimes 2-3 degrees higher than with my digital thermometer in bright afternoon sunshine. Which is slightly worrying. Unless I am getting a reading from a thermometer in 
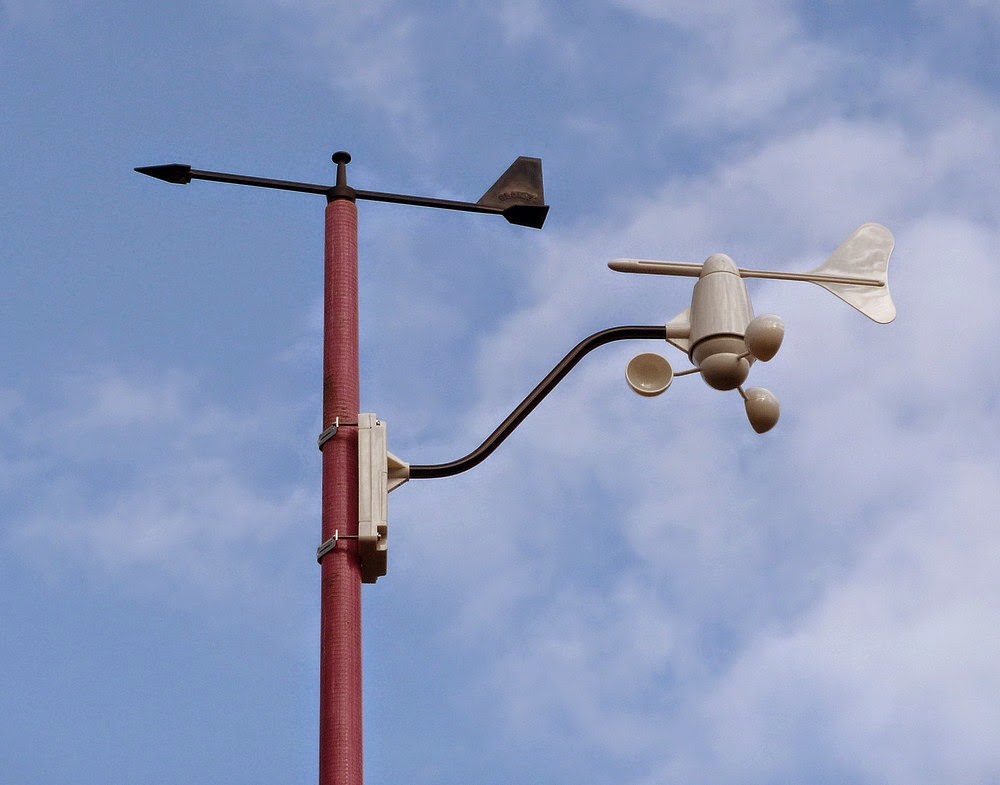
the wind measuring instrument which I remember was mentioned in the instructions. I shall have to look into this. [See paragraph below.]

The wind measuring unit is out in full sunshine and will be subject to solar heating effects on the casing. Which are almost guaranteed to read higher than a shaded sensor. If this text disappears I will have tracked down the problem. The Hygro-thermo unit is marked 5 channel and an LED flashes [about] every 35 seconds. Presumably this is the period between wireless updates. A small LCD screen shows Channel number temperature and humidity. For some reason changing the batteries for freshly bought new ones immediately stopped the display screen from registering outside temperature on the display module! Having left the display unit on battery power all night it relocated the external sensor. It then exactly matched the In/Out digital thermometer which I have previously relied on for temperature readings. Both outdoor readings of the separate devices now agree to within 1/10 of a degree F in overcast conditions! Though experience shows that they do vary relative to each other.
                                                                                                                
I have yet to get any rainfall readings so cannot comment on the efficiency of the tilting-bucket, measuring device. We have a lot of falling vegetation from the many trees in my back garden. So I may put the rainfall measuring unit on the south side of the house facing a field sized lawn with mown grass.

Levelling is important to the unit's tipping bucket function and a round bubble level is hidden inside the bottom of the case. The unit is quite attractive and unlikely to spoil the appearance of its location if bright white plastic is acceptable. There may be security issues with some locations and an open topped, box will easily disguise the contents. Though not one of metal or it may block the wireless signal back to the display head indoors. The lightweight unit must be fixed down to a flat, easily draining surface to avoid being blown away in a gale!

A rough screen fits loosely inside the funnel mouth to stop larger debris falling in and blocking the mechanism. How it will cope with the countless wind-borne Birch seeds and such fine debris is as yet unknown. The instructions suggest cleaning the remote wireless units at weekly intervals. Which means the unit must be easily accessible without undoing the four fixing screws on the base.

The image below shows the rainfall unit dismantled by turning the two black knobs and lifting the funnel unit free. The central tipping bucket device, bubble level and bottom drain holes are all visible. The funnel moulding has a battery compartment which is sealed with a gasket and cover plate with seven tiny screws. Note that the funnel can only be re-inserted the correct way round. This is indicated by the different lengths of the funnel base matching the heights of the supporting brackets inside the case. Which means that it must be possible to see inside the empty casing when cleaning the unit. Something to think about when choosing a site and fixing platform. Or one could choose to [say] have the battery plate facing the user [or away] when inserting the funnel into the case.
 
The claimed range of the remote wireless sensor units is 100m in a straight line. Walls, metal and other structures in a building may well affect this range. Presumably the rainfall measuring device works by counting the number of tips of the see-saw bucket device electronically. Rainwater fills one side of the tipping bucket  to unbalance the rocker. So that it eventually tips and empties automatically in readiness for another refill by more falling rain. The area of the funnel opening relative to the tipping bucket size provides the rainfall depth in whichever units the user chooses on the display and computer software. It is important that the device is fixed out in the open so that it is not sheltered by trees, bushes or building overhangs. Otherwise it is likely to read very low local rainfall!

I just noticed that the weather forecasting display on the top left of the screen [cloud, sunshine, etc] changed on cue from sunny periods to cloudy as cloud covered the sky.A nice confirmation that it is working as intended. As I write this the screen is showing the sun peeking from behind the clouds. Exactly on cue as the cloud thins and the sky brightens. The forecast weather display relies entirely on barometric pressure. At other times the screen has remained fixed on showing cloudy in a perfectly clear sky from dawn to late at night!

Overall, I would say that the W831 is of good quality but the supplied software needs some work. There are some serious doubts developing about indicated wind speed. The cup rotor has been spinning well on occasions but the display has yet to rise above 3 m/s. [About 6.5 mph!]  With no rain forecast I haven't set up the wireless rainfall sensor yet. I know it works because the bucket tipped when I was examining the unit and the display updated rainfall by 1.4mm. So I am happy with my birthday present for the moment. Thank you, Dear!  :ø)

An update: The wind today, Wed. 29th April, is gusting and highly variable as to direction. It is forecast to gust to 15m/s locally. [Over 30mph] I have been regularly monitoring wind speed but the Ventus display unit has never risen above 3.4, then 3.8 and now 4.1 m/s at 14.00. [~7.5, 8.5 and 9mph respectively using the 2.2 conversion factor.]

Earlier I tried holding a cheap, hand-held digital anemometer at about half mast height and briefly registered 6 m/s.[13 mph]  Though this device uses a small propeller with a very much faster response to gusts than the larger Ventus rotor. The much larger, vintage Casella has been rotating briskly but certainly not remotely as fast as it has sometimes in the past. The wind gusts are expected to peak at 15 m/s at around 15.00pm this afternoon. There is a clear run of air to the Ventus anemometer from the South-west. Because of its greater lag during gusts the Ventus is expected to display a lower average speed on the display unit. Only a prolonged gust would raise the reading significantly.

NOTE: I have discovered that the Ventus display unit can be set to Gust by pressing suitable buttons. The updating still only occurs at about 30 second intervals but at least it registers wind speed more as I prefer it. The normal [default] settings average the measured wind speed over 5 minutes. Which helps to explain the very low readings until now. 

I have still not heard from Ventus about the software problems or possible alternatives.

Click on any image for an enlargement.

(  )

Sunday 19 April 2015

Weather Capture Advance 1.4

)

The Weather Capture Advance 1.4 software comes on a disk with the Ventus W831 Weather Station. Multiple languages are offered.

While it provides a wide range of measurements in an attractive and easily readable form there are some problems with the settings options.

The first problem is that full screen viewing is not available despite the usual "Maximise" button being provided.

Here is a larger image of only the [software] viewing screen area captured on a sunny morning in mid April with very light winds and no rain.

Note the very large range of readings available. The screen can be saved as an Excel file or as a text file. Both can be recorded automatically or at many different intervals chosen by the user.

I particularly like the wind rose to indicate wind direction and speed. A handy feature for recording highly complex data. Making it larger would have been desirable but there isn't much room on such a complex graphic.  


The Location settings box is clearly chopped off at the bottom. There is no means to fine tune location despite all the adjustable scales being provided unless one chooses USR [defined] which does not allow any location name to be entered. Otherwise, moving the cursor over them produces no reaction. What is missing at the bottom?


Here the Temperature/Humidity settings adjustment box is chopped off at the right. How can one make any meaningful choices regarding dewpoint? 


These are the display settings for the software chart/screen. [Not the W831 display unit] All is well here with quite a decent range of options.


These are the W831 display screen settings.

Note how the settings box is chopped off on the right. There is no settings confirmation button so one can only press 'Enter' on the computer keyboard to confirm changes. Rain and Wind cannot be altered.

BTW: I have adjusted all the box sizes in PhotoFiltre image handling software. In reality each Settings adjustment box has its own size.

I tried uninstalling and reloading the software without any noticeable change.


To add to the confusion this is how the software appears on Ventus' own product website:

As can be seen it is completely unlike anything on the supplied disk.

I have contacted Ventus by email to see if this software is available.


Click on any image for an enlargement.
*

Friday 17 April 2015

Ventus W831 Weather Station. First impressions.


The lack of direct reading of wind speed and direction prompted the arrival of a Ventus W831 weather station as a present for my birthday.

The overall impression is one of high quality plastic casting and the complexity of available readings on the display unit.

The 28½ pages of English language instructions are competently written but sometimes rather complex to take in on first reading. They also lack some important details. Perhaps more importantly, they are sometimes, simply incorrect. For example, they talk about releasing latches for hatches on battery compartments. When in reality all the batteries are hidden behind moulded plastic plates with sealing rubber gaskets. All of which require quite a small screwdriver to remove and replace several tiny screws in each case. I found a jewellers screwdriver with a straight blade worked best on the cross-head screws.

Only the indoor display unit has easily accessible batteries. Working on the remote units out of doors would introduce a very high risk off loss of these tiny screws. It is strongly suggested that the batteries are changed with the units brought down and resting on a lipped tray to catch any escaping screws! This may seriously affect where the units can be sited to allow easy removal.

As can be seen in these images I have added the combined, all-plastic anemometer and wind vane unit to my wind surfing mast. Simple stainless steel bar clamps and 2"/50mm long screws are provided and allowed easy fixing of the wind instrument base to my mast. Though the screws were only just long enough for my use, most owners would probably use a smaller diameter pipe.

The all white, Ventus wind vane is rather easier to see against the background trees than my original black yachting arrow. Though seen against a bright sky it can appear quite dark in silhouette.

I originally bought this lightweight, fibreglass mast very cheaply from a flea market to support a simple plastic wind vane borrowed from a yachting application. The GRP mast is very light but stiff and provides perfect support for lightweight instruments such as these. Though it does flex slightly in strong winds it has the advantage of raising the wind reading units some 5 metres off the ground without the risk of it causing damage or injury. Which might well occur if a heavier metal or wooden mast fell in a storm.

Ideally the mast ought to be 10 metres high to comply with meteorological standards. Even higher for situations with obstructions like trees and buildings. Only an open field would really allow the minimum height of 10m for truly accurate wind measurements. I decided that 5 meters was ample for my situation but then I am not expecting professional standards. Adding an aluminium extension pole to the mast only added more flexibility to the mast itself.

At least my wind measuring instruments are erected in the open and not slung under the eaves of a bungalow or carport surrounded in dense shrubbery. Which is quite a common sight in many cases as I cycle the lanes of Denmark. Weather stations are remarkably popular decorations for Danish homes. Though very few owners seem to grasp the need for height and clear exposure to obtain accurate wind readings. No doubt some of these devices are also connected to the Internet. They feed this glaringly incorrect information out to a wider audience as if it contributed to the sum of all knowledge. The Ventus W831 does not offer such a live Internet connection. Only an application which allows weather data to be saved on one's home computer.

I mounted the Ventus wind apparatus just below the original wind vane to ensure there was no physical interference. The extension arm was arranged to point south to provide the "cleanest" air from the prevailing wind directions. SW and SE are the norm for my location. Though, interestingly, the wind was coming from the north on the day I set everything up. Thankfully both vanes are following each other very closely. So I can be sure there are no interference problems despite the very unusual wind direction meeting the mast first after filtering through tall but open trees. The Ventus is much more sensitive to changes in direction of light winds thanks to small, stainless steel, journal, ball bearings. So shaft friction is at a [very low] minimum.

In this image I have dimensioned the case and rather small screen of the display unit. The screen is actually slightly smaller than my Imperial dimensions suggest. A difficult photographic subject whether the screen is lit or not. The protective plastic screen cover is rather shiny and readily reflects well lit backgrounds. I have adjusted the image brightness to better match the actual view. The screen is actually quite dark but legible in both cases of lit and unlit. The displayed text, graphs and symbols appear slightly sharper than these images suggest. Since the screen relies on reflection in the unlit mode it helps to have it placed in a good light but not directly reflecting a window. Reading it by artificial light will probably require that the screen is lit after dusk.

The buttons along the bottom of the screen make an irritating electronic squeal from inside the display case when released. Nor do they always have the desired effect! Particular problems exist around the wind speed settings and labels. The Set button steps through changes which should really be changed by the arrow keys. Wind chill is fixed in the Centigrade scale as far as I can discover. Which hardly makes sense when Fahrenheit temperature scales are chosen for display.

Here the screen is lit with the compact [plug in] 7.5V power supply. The display unit takes four internal AA batteries but they would drain if the screen was lit constantly. There are useful options for control of screen illumination but the PS is essential for a constantly lit screen. 

Lacking batteries and switching off the power supply caused the screen to return to default settings on start-up next day! I had to reset the display to m/s wind speed and Fahrenheit temperature scales. The location had also changed from Copenhagen to Berlin.

Once a city is entered I can't see how any finer location setting is possible. The adjustable scales are shown on the bundled software screen but they are greyed out. Rather strangely, there is no option to allow fine adjustment of location. No batteries are supplied with the Ventus W8311. An omission which caught us out as no fewer than eight  'AA' size batteries are required. Four in the display unit and two each in the wind, hygro-thermo and rainfall units respectively. Harvesting used batteries from various clocks and thermometers around the house provided enough for the wind and hygro-thermo units to be tested. The display head and rainfall would have to wait until I had reached the shops.

Low wind speed reading is really remarkably sensitive. With readings down to 1/10th of one meter/second! Far more sensitive than my large, all brass, copper and bronze vintage Casella anemometer. However, there is quite a lag between movement of the Ventus rotor and screen updates appearing indoors. The same goes for the wind vane. With very long pauses between changes to angles of pointing after I have watched the vane turn. I placed the mast outside so that I could easily watch the wind mast over the top of my computer monitor while sitting in front of a window. I shall have to time the separation between updates to confirm exactly how long they are. [About 35 seconds assuming a change in pointing or wind speed]

See W831 First impressions Pt 2 for more.

Click on any image for an enlargement.
*

Wednesday 14 January 2015

Casella combined cup anemometer and wind vane

*

This most attractive, cased wind measuring instrument was auctioned in 2014 on eBay(UK).

However, the seller was not open to bids from outside the UK. It sold on a single bid.

I have borrowed the excellent auction images for non-profit, educational use.

Parts of the wind vane show slight weathering which has produced a delightful, natural patina. Leading one to suppose that the unpainted finish is totally original. There is no sign of the typical, overall, grey paint used for permanently mounted meteorological instruments having been removed. In fact there is slight corrosion typical of copper around the anemometer cups. This is only likely to be cosmetic and can be easily cleaned off if desired. In the absence of professional clock cleaning fluids, ammonia, soft soap and water will do.


Note how well every item has its own location and protection against movement within the quality [mahogany?] carrying case. Such a travel case provides ready clues to the replacement and checking that all parts have been safely rehoused following dismantling after use in the field. The loss of a single item would probably make the device useless in the absence of spares. Though I note a rather large object is missing in the front, right corner space. Mounting blocks are fitted there but the space is vacant. The space available looks identical to that of the flange space alongside.

The instrument is provided with hooked, steel, ground pegs, guy lines with tension toggles and a flange-mounted stub mast. This suggests that the instrument was designed to be portable and for temporary erection only. Perhaps for use by expeditions. One can but guess as to the base upon which the mounting flange would rest in use. A handy tree stump, pipe or a sturdy tripod perhaps?


The bare, copper cups of the anemometer must have been most attractive turning brightly in the sunshine. The bronze casing of the head looks deliberately well finished. Despite the overall bare metal finish, the entire construction follows normal practice for British met-office approved instruments. Usually provided by established companies like Casella and Munro. This particular instrument is from Casella and the anemometer parts look [almost] identical to my own Mk2.

The anemometer is of the mechanical counter type and measures in miles. An observer would note the number visible in the counter window. Then read the number again after a fixed period of time. Subtracting the first number from second would allow the measurement of the wind at that location. The counter window being arranged horizontally suggests that the instrument was not usually raised very far above the observer. Mast mounted instruments would probably have a downward facing window for easier reading. Though a horizontal window might well have been used where easy access was possible via fixed ladders.

The wind vane is also entirely mechanical, weight counterbalanced and rotates below the anemometer. Its pointing angle being read off the large, clear, supplied protractor. Which is graduated by battens in 10 degree steps. Longer battens at 30 degree steps and digits to indicate the 90 degree angles. Most common wind vanes use the compass points.


Click on any image for an enlargement.
*

A vintage Wilh.Lambrecht pitot tube airflow test meter.

*
I was lucky to find a very high quality measuring instrument in a wooden case at very low cost. It uses the pitot tube principle to measure airflow at the tip of the 'hockey stick' measuring wand.

It might have been used for measuring airflow in pipes or ventilation ducts.

The cylindrical meter reads in m/s. [Meters per second] The black handle can house two 'C' size batteries. These would light the small torch bulb which shines though a glass window in the meter base.Which would illuminate the measuring scale in poor conditions or even at night.
The bent main tube [wand?] is slightly damaged cosmetically. While the lower part of the wand is protected with a plastic coating. It is possible the damage was caused during normal use by an industrial ventilation engineer. The rest of the instrument is in fine condition as if from careful use.


Here is the active tip. The slot must be an air balancing vent. The orange cap has a hole in the centre of the nose to accept the airflow to be tested.

Something long and thin is missing from the slot provided in the case. Perhaps an alternative tube to fit inside the instrument? Or even a cleaning device?

The small vial has a label but has no contents. This vial is usually stored in a hole bored in one of the support bulkheads near the instrument's handle.


Here is the paper label found in the small glass vial.
My limited understanding of German suggests:
"Replacement nozzle 0,5 "
[A comma is used to define the decimal place on the Continent.]


Here is a close-up of the meter and one of its internal scales.

The main tube [wand] can be removed by unscrewing the central knurled ring.

The two large, knurled knobs on top the meter head rotate the four internal meter scales into view. The small, indicator is seen at rest in the meter window at the '0' position.

The scales are mounted on a rotatable white drum and are graduated as follows: 0-2.6 m/s. 0-8 m/s. 0-18 m/s. 0-50 m/s.

Which means that the device can measure over a range from roughly 0 - 110 mph. Since there are no visible moving parts one must assume that calibration between the ranges is made automatically by changes made internally.


Here is the connection between the test 'wand' and the top of the meter head. Note the perforations in each component and the very high quality of manufacture. Most of the visible components and fixing screws seem to be made of stainless steel or finely machined aluminium alloy.


Here is the small light bulb for illuminating the internal scales.

The base of the "torch" handle is provided with a standard tripod screw, mounting hole in a sturdy, knurled, screw in bush.


And here is the opal window through which the bulb shines.


Here I am testing the instrument in the open air on a windy day. A small electronic 'fan' anemometer is fixed near the head of the pitot tube for comparison. Both devices seem to agree but with varying reaction times to gusts.


This device cannot be easily used for measuring wind speed because it does not point continuously into the wind. Nor does it seem particularly suited to outdoor use.


Lambrecht meteo still manufacture a whole range of environmental measurement instruments at Göttingen, Germany.

http://www.lambrecht.net/de/home


Click on any image for an enlargement.
*